Quick Start Guide
Introduction
Welcome to the CloudAgent Quick Start Guide!
Our aim is to assist you in getting started swiftly by providing step-by-step instructions for the basic setup process and introducing you to the impressive range of features and functionalities offered by our platform. This guide will serve as your go-to resource, ensuring that you make the most out of our services.
Within this guide, you will find comprehensive coverage of vital aspects, including Settings configuration, creating phone numbers, adding agents, and much more. We have left no stone unturned to equip you with the knowledge and skills necessary for a successful setup.
In addition to this guide, we are delighted to offer dedicated training sessions facilitated by our transition team. These sessions are specifically designed to provide you with further support during the setup process, enabling you to optimise your utilisation of our platform.
So, let's embark on this exciting journey together and make the most of what we have to offer!
Prerequisites
Please ensure that your work environment has the necessary infrastructure to get started. Adhering to these guidelines will facilitate a seamless and productive setup process for your contact center operations
- Agents should have a system with the Chrome browser installed.
- Ensure a stable internet connection with 0% packet loss to our application.
- For optimal performance, we recommend a minimum internet speed of 128kbps per agent specifically for CloudAgent traffic.
- If you utilize additional software such as CRM, it is advisable to consult your IT team to determine the required bandwidth for those applications.
- Use a LAN connection instead of relying on WiFi or hotspot connections, as the latter may be prone to fluctuations in performance.
- Having a PSTN number (mobile or landline) for agents is optional.
- Agents may have the option to log in using SSL VPN for PSTN markets, and for VOIP markets, Webrtc functionality operates over the internet
Login to Cloud Agent
- To access your CloudAgent account, simply click on the URL provided in the account activation email sent to you. This will redirect you to the login page.
- In addition, you can refer to the appendix section for more details on the login URL.
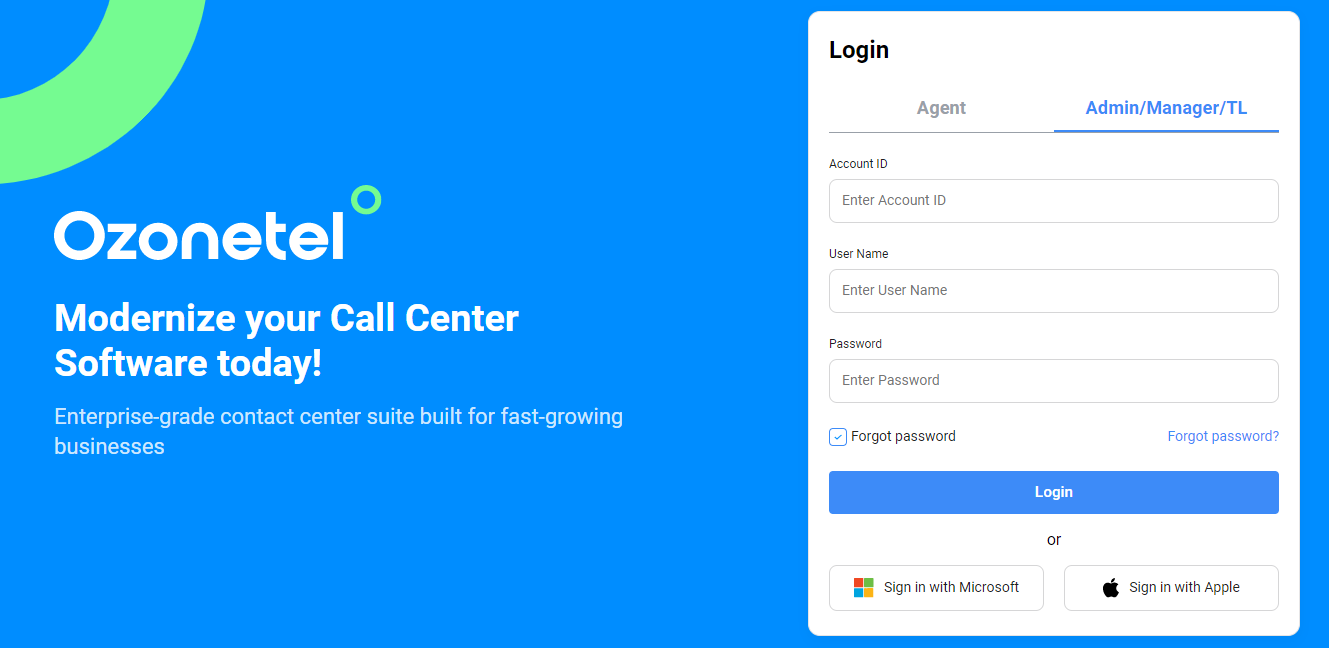
- To login as an Admin
- Click on the Admin/Manager/TL tab
- Enter the credentials provided in the account activation email & click on Login
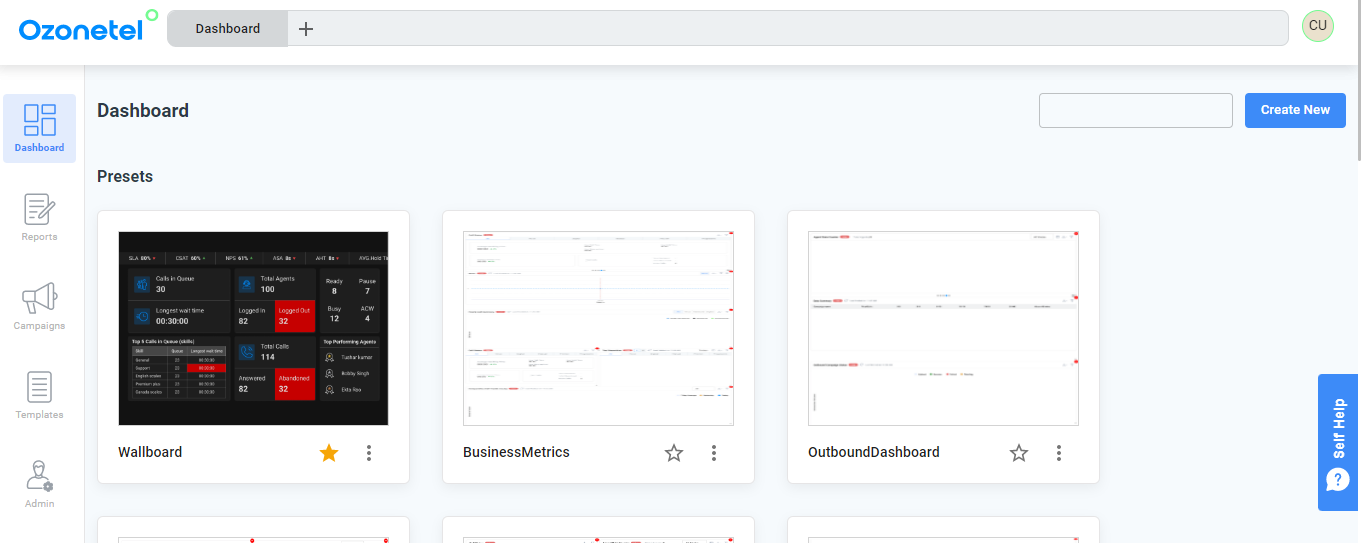
- Upon successful authentication, you will gain access to the Admin account & redirected to the home page
- As an admin, you will have administrative privileges, enabling you to manage and configure various settings within the system.
- This is the central hub to access all the CloudAgent features.
Now that you have successfully accessed your Cloud Agent account, let's move forward with the essential configurations for your account.
Here's a quick video that talks about the configurations required to get started.
1. Add Agent(s)
When you add an agent to the system, you are essentially creating a personalized user account for them with special permissions and abilities.
Follow the below steps to add an agent to the CloudAgent account:
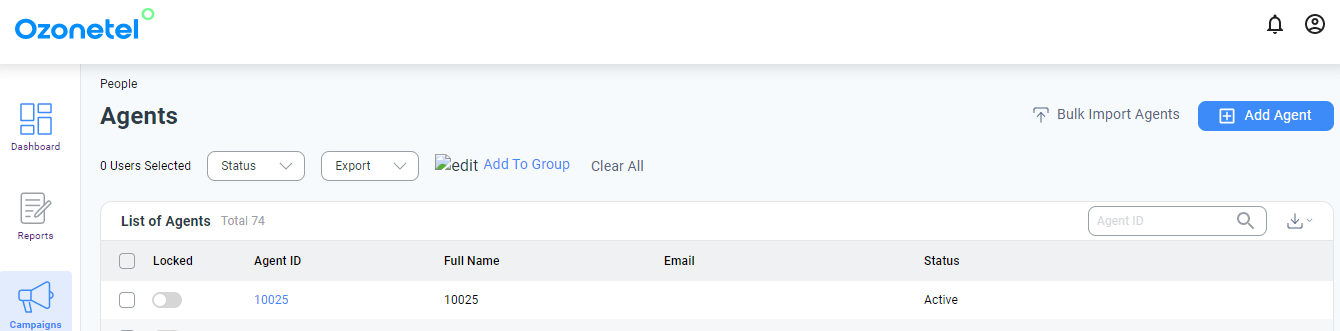
- Select 'Admin > People > Agents' on the left navigation menu
- Click on the 'Add Agent' button on the top right corner
- Input the required information for agent creation. Refer to the below table for details on each of the field(s)
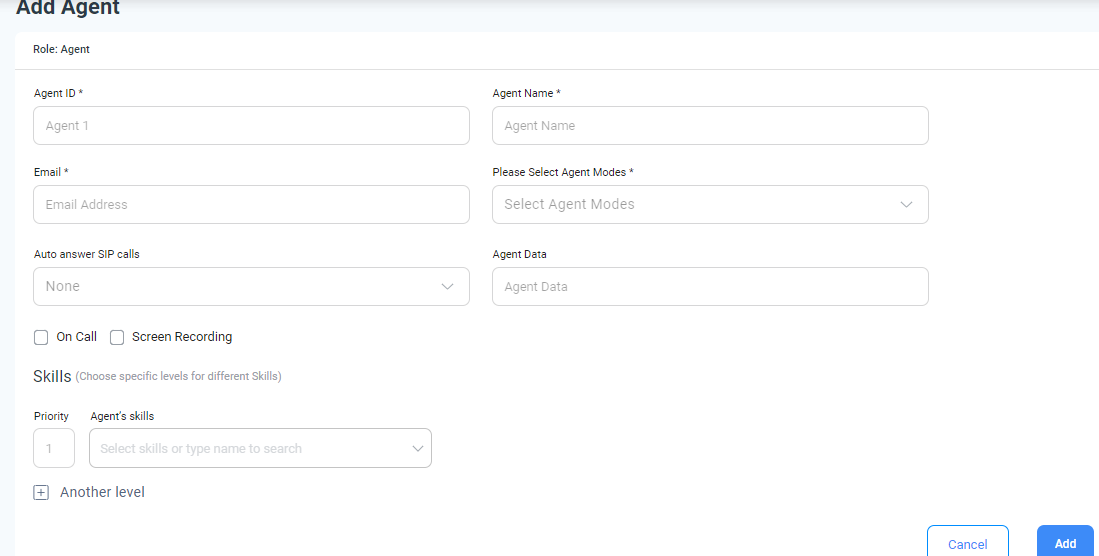
| Field | Description |
|---|---|
| Agent ID (required) | The name by which the Agent is to be mapped on the portal |
| Password (required) | Password can be any alphanumeric character |
| Agent Name (required) | It can be the same as the Agent ID if required |
| Email ID of the agent. | |
| Agent Data | Additional Information on the Agent |
| Agent Modes (required) | Select the appropriate modes for the agent
|
| Auto answer SIP calls | This option allows you to set for each agent whether they should auto-answer calls. The options are:
|
- Click on the 'Save' button to add an agent to the CloudAgent account
The next step is to add phone numbers corresponding to the agent(s) in the CloudAgent account.
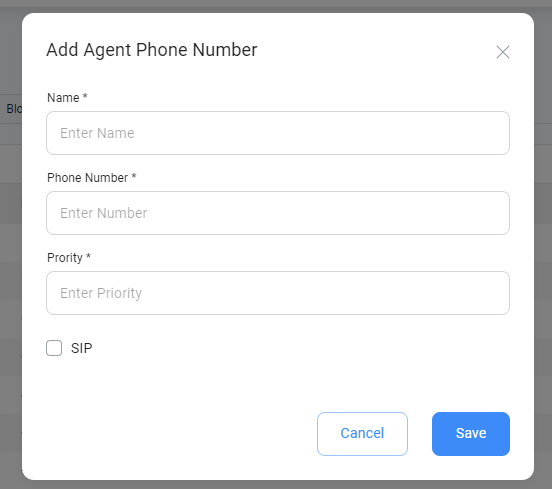
2. Adding a phone number
To enable agents to handle incoming and outgoing customer calls, you have the option to create a dedicated phone number. Depending on your specific requirements, you can choose between creating a Phone number or a SIP number.
Note: Agents must use the phone number or SIP number to log in to CloudAgent.
Follow the below steps to add a phone number to the CloudAgent account:
- Navigate to 'Admin > Configurations > Manage Numbers' and select 'Phone Numbers' from the left menu.
- Click on the 'New Number' icon on the top right corner and choose the 'Agent Phone Number' option.
- On the Manage Numbers page, click on the 'New Number' icon, located at the top right corner of the page, and choose the 'Agent Phone Number' option.
- Provide the phone number (or SIP number) & the corresponding agent name to whom it will be associated.
- The format of the phone number can include the country code with '+' or just the number.
- In case of SIP number creation, select the 'SIP' checkbox without fail.
- Click 'Save' to add the new phone number for an agent.
While the agents are set up, it's time to create skills in the system.
3. Create a skill
Skills provide administrators with a means to classify agents based on their expertise and capabilities within the contact center system. Calls and digital communication can be efficiently routed and prioritized through proper skill assignments.
Below are important points to note regarding skill(s):
- Categorization: Skills can be used to categorize agents based on their proficiency in specific areas. Examples include language proficiency (e.g., English, Spanish), specific roles (e.g., sales, support), technical expertise, etc.
- Call Routing: Incoming calls or digital communication can be routed to the most suitable agent through proper skill assignment
- Prioritization: Skills can be prioritized to determine the order of call redirection, allowing agents with higher expertise to receive relevant calls first
Follow the below steps to add a skill to the CloudAgent account:
- Navigate to 'Admin > Configurations > Skills' on the left navigation and click on the 'Add Skill' button.
- Input the required information for skill creation. Refer to the below table for details on each of the field(s)
| Field | Description |
|---|---|
| Skill name (required) | The selected skill group will be greyed out. Inbound Calls cannot come to the skill group unless the customer IVR is configured for the same. Agents and phone numbers must be predefined before adding a skill group. |
| Skill Location (required) | Locations need to be predefined from the Locations page. This gets linked to a dropdown on the Skills page. |
| Skill Details | Additional details on the skill can be added. |
| Record (required) | Either full or conversation must be selected. Full means recording the entire call from the time the customer enters the IVR. Conversation means only recording the conversation after Agent has picked up the call. |
| Assign Phone Numbers for Hunting (Offline)* | Phone numbers are assigned for offline use when Agents are not available to receive calls. |
| Queue Size (required) | Time that the customer stays in the queue; 0 minutes and 0 seconds means no timeout. If a timeout is selected, a fallback rule needs to be defined. |
| Agents | Agents can be grouped into different priorities for handling calls in the skill. Priority 1 agents are the highest priority and will be offered calls first and Priority 9 will be the lowest. |
| Fallback Rule (required) | Defines what should be the fallback rule for the customer once the Queue timeout expires. Select from the dropdown list. |
- Click on the 'Save' button to add a skill to the CloudAgent account.
The next step is to create a campaign in the system for efficient handling of interactions.
4. Create a Campaign
Campaigns are an efficient way to track a specific set of customer interactions or activities within a contact center.
CloudAgent offers versatile campaign creation options to cater to your unique business requirements. Listed below for reference.
- Inbound campaigns
- Outbound campaign
- Digital campaigns
- Email campaign
- Missed call campaigns
- Send SMS campaigns
- Push data campaigns
While the details of each campaign type are explained in the user guides (refer to the 'Conclusion' section), we will focus on setting up an inbound campaign to get started.
Inbound Campaigns
Follow the below steps to create an inbound campaign in the CloudAgent account:
- Navigate to the "Campaigns" option on the left navigation and click the "Create Campaign" button on the top right corner.
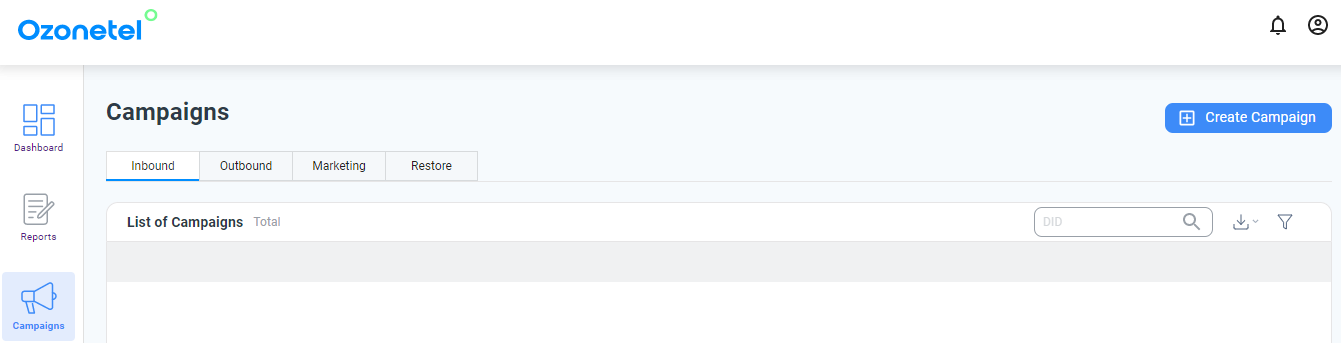
- Select the "Inbound Campaign" option from the pop-up list and click 'Continue'.
- Input the required information for inbound campaign creation based on the requirement. Refer to the below table for details on each of the field(s).
| Field | Description |
|---|---|
| Campaign Name (required) | The name of the Inbound Campaign |
| DID (required) | Telephony number mapped to the Inbound Campaign. This is the number that the customers dial for this Campaign |
| IVR Flows | Select the IVR flow needed for the campaign from the dropdown. |
| Hit ScreenPop URI At |
|
| URL to Push | This URL is to send callback details |
| ScreenPopURL | This is the URL provided by the CRM vendor to fetch the data from the CRM system and show it as an IFrame on the Agent screen. IFrame is the pop-up window that appears in the lower half of the Agent screen. |
| Call Prefix | Caller IDs prefix code (Ex: +91, 0, ..) |
| Dispositions (required) | Select the dispositions from the list available for this Campaign. |
| Disposition Type (required) | These options refer to different ways that a disposition, or outcome, can be assigned to a call.
|
| Wrap-up Time (required) | This is the time in seconds available to the Agent for after-call work. Value 0(zero) means an infinite time for the Agent. |
| Block Number | A "Blocked Number" option in a campaign refers to a feature that allows you to prevent certain phone numbers from being called. If the "Block Number" option is selected, the system will check the list of blocked numbers before making a call. If the number being called is on the blocked list, the call will not be made. This can be useful for preventing calls to numbers that have previously requested not to be called, or to numbers that have been flagged as spam or fraud. |
| Block Number Group | This group can be created and managed by the user or administrator. The "Block Number Group" is a named list of phone numbers that have been designated as blocked numbers. Once a group is created, it can be easily referenced by name when setting up a campaign. This feature allows for greater flexibility and ease of management when it comes to blocking numbers. |
| ACW for UnAnswered Calls | Check this box if you want the Agent to wrap up Un-Answered calls. With this box checked, Agents will go to ACW State even for unanswered calls. By default, this box is unchecked. |
| Skills (required) | Add the list of Skills available to the Agent for this Campaign. |
| Script | Add a description of the campaign. |
- Click on the "Save" to create the inbound campaign.
5. Add a disposition
Disposition captures the outcome of a call, including call nature, customer feedback, and next steps, providing valuable insights for analyzing call trends and improving customer service.
Follow the below steps to add a disposition to the CloudAgent account:
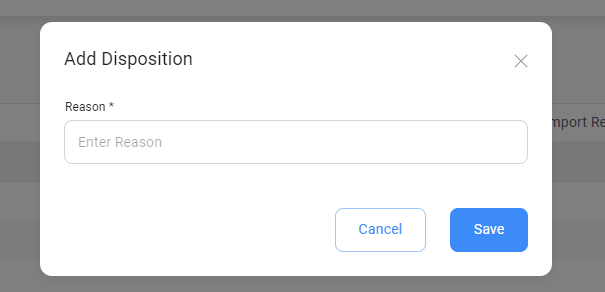
- Navigate to ‘Admin > Configurations > Dispositions’ and click on the 'New Reason' button on the top right corner.
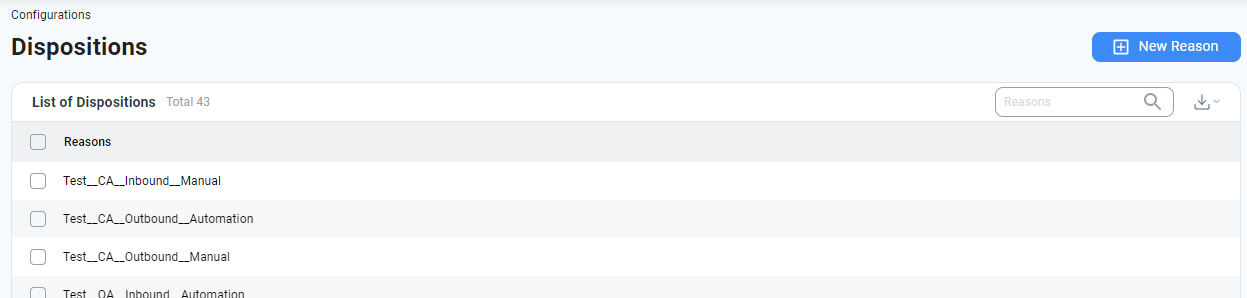
- Input the reason as the new disposition option based on the requirement and click 'Save'.
6. Configuring an IVR flow
IVR is an automated telephony system that uses voice prompts for user interaction and task execution. It is mainly used to improve the efficiency of the contact center operations.
This is an optional configuration and a decision needs to be taken on use-case basis.
To create a basic IVR flow in your Cloud Agent account, we recommend referring to our instructional video. The video provides an overview of setting up the basic IVR flow.
Note: This completes the setup process (as an Admin) to facilitate the contact center operations including calls and digital conversations.
7. Call handling
Now that the admin configurations are in place, let's explore how to handle incoming calls using the agent toolbar.
Follow the below steps:
- Log in to the Agent toolbar with the provided credentials.
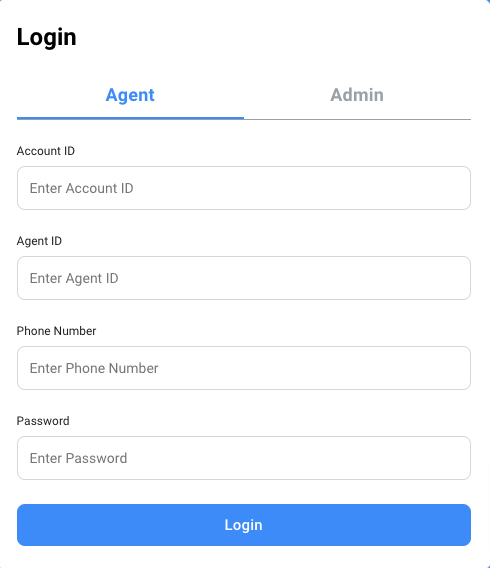
- Input the required information:
- Account ID: The account username is provided in the account activation email.
- Agent ID: Input the agent ID that was created under ‘Configuration > Agents’ in the admin login.
- Phone Number: Input the phone number created under ‘Configuration > Phone Numbers’ corresponding to the agent in the admin login.
- Pin: Enter the password assigned by the admin for your agent ID.
- Click on the 'Login' button to access the agent toolbar.
- You are now ready to take calls.
- Upon logging in, the status of the Agent will be in the ‘NotReady’ state. Click on the highlighted buttons to move to the ‘Ready’ state.
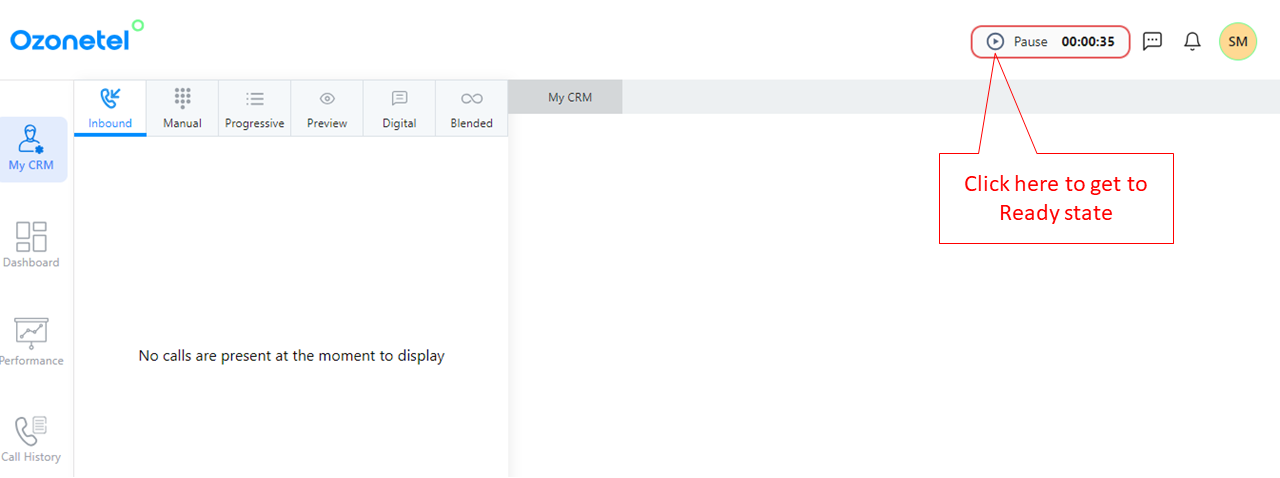
- An available agent in the 'Ready' state can accept incoming calls on the assigned Direct Inward Dialing (DID) number, ensuring that calls are directed to agents who are prepared and accessible to handle them.
- In addition, the following are some additional details to understand the agent toolbar layout.
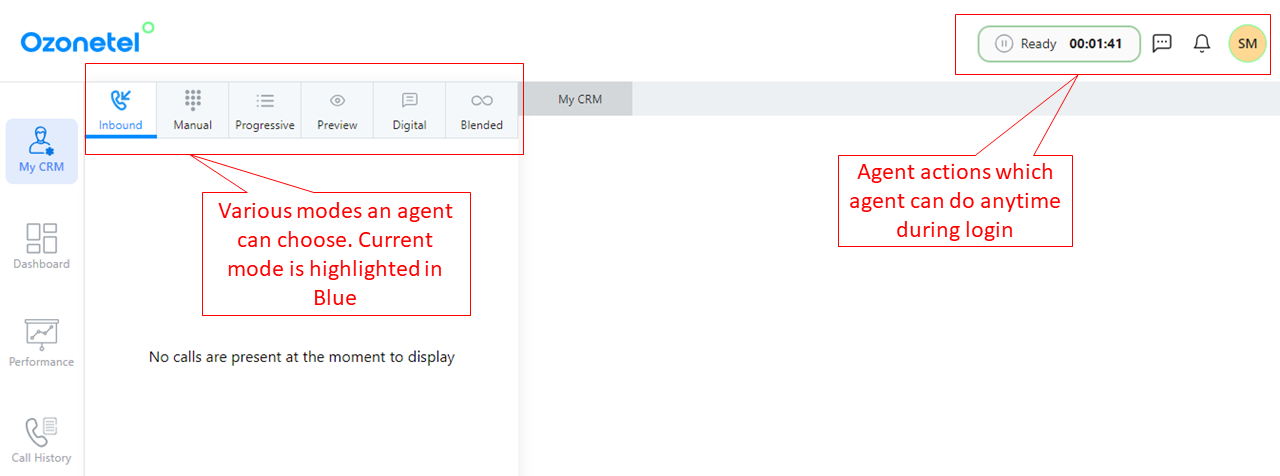
- Agents in Inbound mode receive an incoming call notification on their screen and can simply click the answer button to connect with the customer.
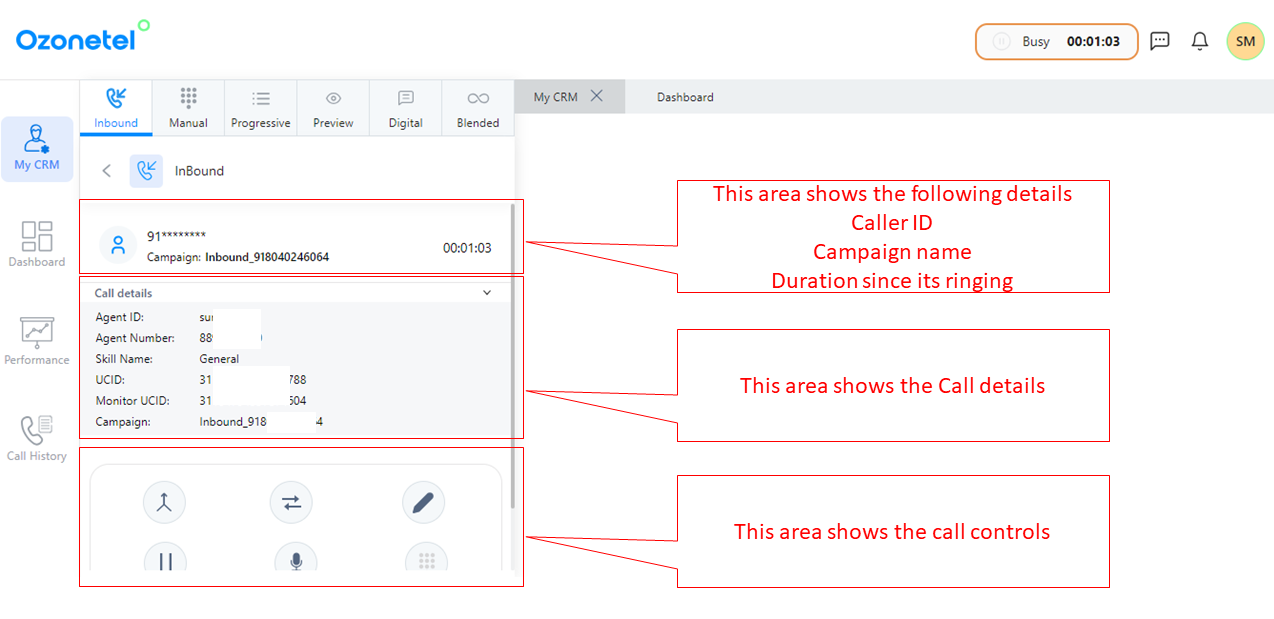
- Agent(s) can end the call using the "hang up" button. Other call controls include mute, hold, transfer, and conference. Refer to the user guides for further details (in the 'Conclusion' section).
- After each call, agents must select a relevant disposition from the provided codes and save it by clicking "Save Disposition".

This completes the call-handling process in CloudAgent.
Conclusion
Congratulations on completing this guide!
You have acquired valuable knowledge on setting up a fundamental flow for your Cloud Agent account. By following the steps and grasping the different configurations, you are now ready to effectively manage a contact center and deliver exceptional customer service.
Don't forget to explore additional functionalities and features to further enhance your contact center operations.
Best of luck in your journey with Cloud Agent!
Updated 3 months ago