Integration with Leadsquared
This support article provides a detailed guide on how to integrate CloudAgent with Leadsquared CRM.
Technical Prerequisites
- LeadSquared Account
- Must have active LeadSquared user credentials and permission to install marketplace apps.
- Browser Compatibility
- Preferably Chrome and Edge.
- Supported Editions
- LeadSquared SaaS
- Permissions Needed
- LeadSquared Admin role to install the “Universal Telephony Connector.”
Core Features & Behaviors
| Feature | Description |
|---|---|
| Click to Call | Standard CTI Click-to-Call (C2C) |
| Screen Pop | On inbound or outbound calls, CloudAgent searches LSQ records using the caller number (caller ID). • Based on the search results, the associated contact or entity page is automatically opened in LSQ. • This ensures agents have context before beginning the interaction. |
| Call log/call task Creation/Updation | • When a call is received or made, CloudAgent sends the event data and call recording to the LSQ-defined callback URL. • A call task or log is created for all types of calls (inbound, outbound, manual, dialer). • These tasks can include metadata such as call duration, disposition, and call outcome, depending on the configuration of the LSQ integration. |
LeadSquared (LSQ) – CloudAgent Integration steps
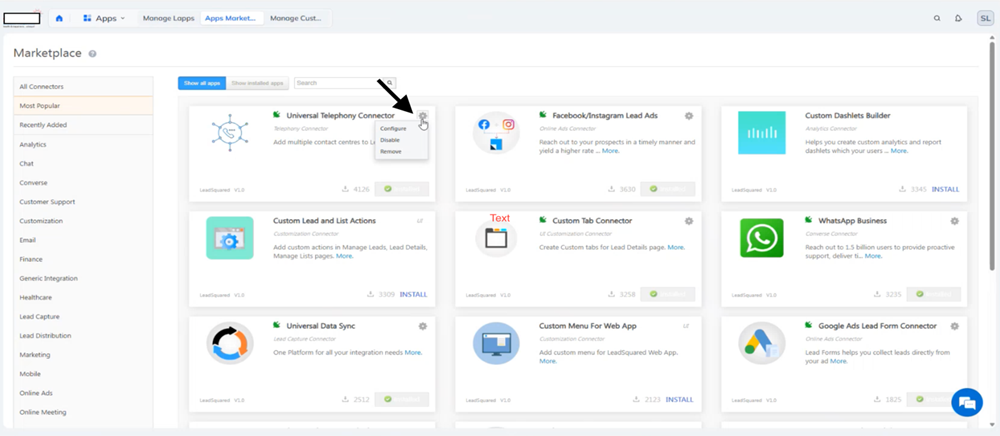
1. Access the LSQ Connector Settings
-
Log in to your LeadSquared Admin Panel.
-
Navigate to Apps → Marketplace → Universal Telephony Connector.
-
Click the Settings icon → Configure.
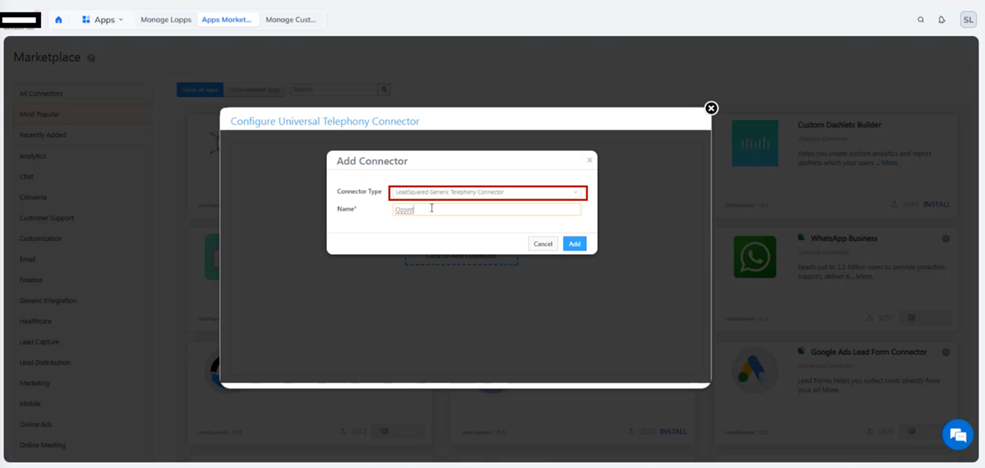
2. Add the Telephony Connector
-
Click Add Connector.
-
Select LeadSquared Generic Telephony Connector.
-
Enter a connector name (e.g., Ozonetel) → Click Add.
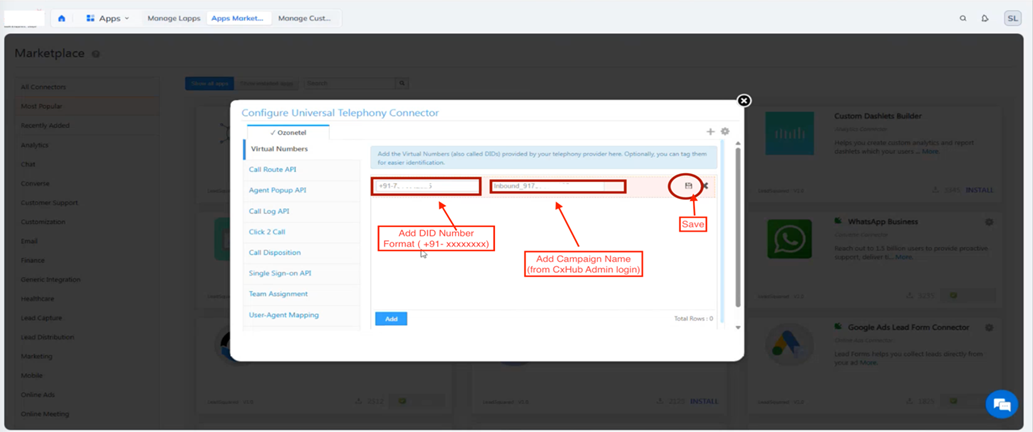
3. Map Virtual Numbers and Campaigns
-
Go to Virtual Numbers.
-
Add DID Numbers in the left box in the format
+91XXXXXXXXXX. -
Add Campaign Names (as per CXHUB Admin Login) in the right box.
-
Click Save.
-
-
For multiple campaigns, click Add to repeat the mapping and save again.

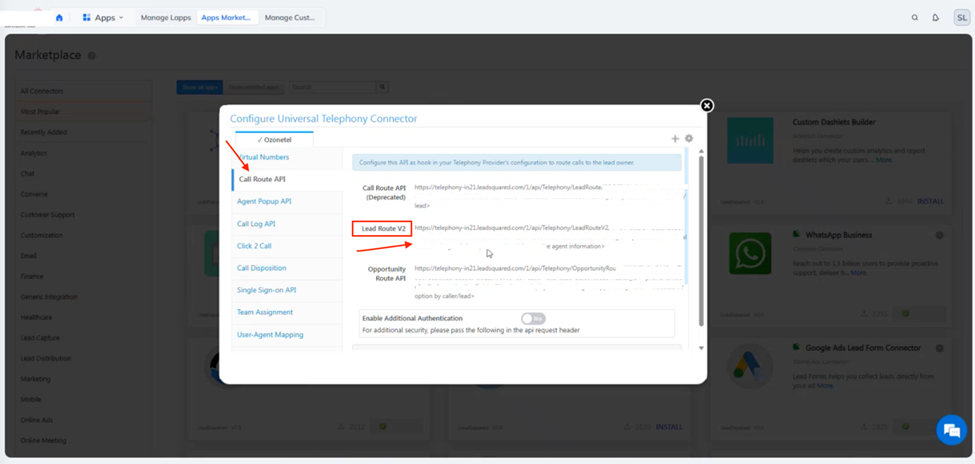
4. Configure Call Route API (Sticky Agent)
-
Navigate to Call Route API.
-
This is required only when Sticky Agent Routing (Lead Owner-based routing) is enabled.
-
If applicable, share your LeadRoute API, a sample lead number, and the fallback condition with the Ozonetel Configuration Team at [email protected].
5. Configure Agent Popup API
-
Go to Agent Popup API and copy the LSQ Agent Popup URL.
-
Prefix it with Ozonetel Wrapper and add the LSQ Agent Popup API.
Ozonetel Wrapper for ScreenPopup:
https://ivrapps-inccaas.ozonetel.com/Generic_LSQ_ScreenPopUp/screenPopup.php?PhoneNumber=&url=<Your_LSQ_Popup_API>Example:
https://ivrapps-inccaas.ozonetel.com/Generic_LSQ_ScreenPopUp/screenPopup.php?PhoneNumber=&url=https://telephony-in21.leadsquared.com/1/api/Telephony/AgentPopup/ORG6xxx/xxxxxxxxxxxxxxxxxxxxxxxxxxx/xxxxxxx-xxx-xxx-xxxx-xxxxxxxxxxxxxxxxxxx4Ensure no spaces in the API URL.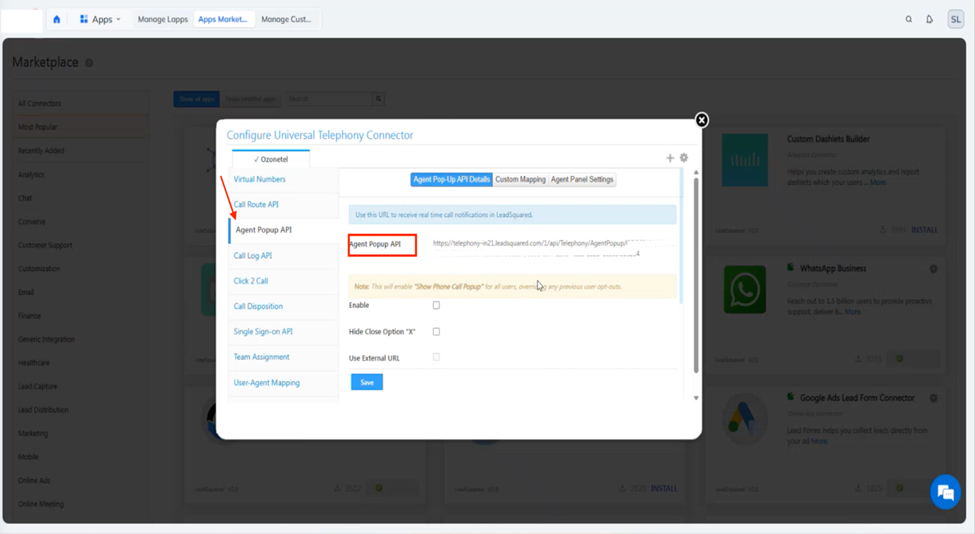
‘Copy the Completed API and Log in to the CXHUB Admin Login.’
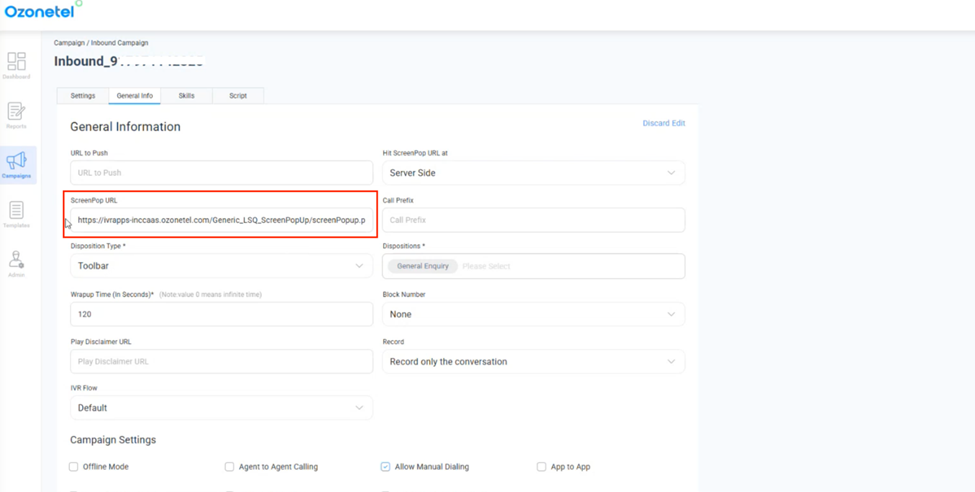
6. Update CloudAgent Campaign Settings
-
Log in to CXHUB Admin → Campaigns → Inbound/Outbound Campaigns.
-
Under General Info, set:
-
Hit ScreenPop URL at: Server Side.
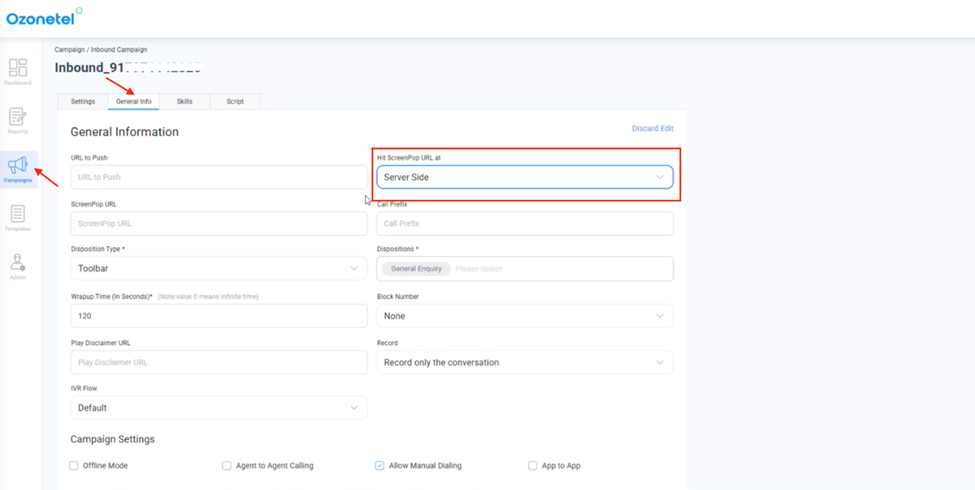
-
Paste the complete Agent Popup API (from Step 5) in the ScreenPop URL field.
-
-
Verify no spaces at the start or end → Save Changes.
-
Repeat for all campaigns requiring LSQ integration.
7. Enable Agent Popup in LSQ
-
Return to LSQ Marketplace → Universal Telephony Connector → Agent Popup API.
-
Check Enable → Click Save.

8. Configure Call Log API
Depending on your LSQ setup, follow the relevant use case below:
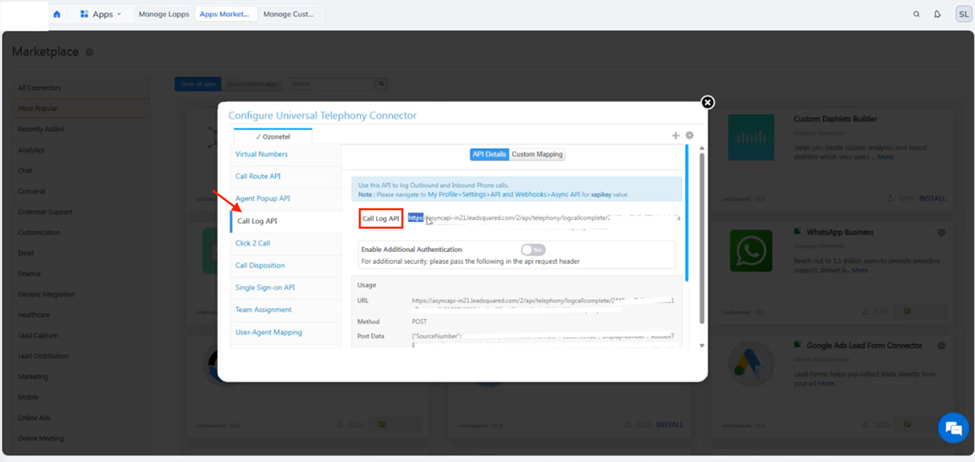
Use Case 1: Standard LSQ Call Log API
-
LSQ API:
https://asyncapi-in21.leadsquared.com/2/api/telephony/logcallcomplete/<APIKEY>/<ORGID> -
Prefix it with the Ozonetel Wrapper:
https://ivrapps-inccaas.ozonetel.com/Generic_LSQ_Callback/api.php?action=callback&customerCallBackURL=<LSQ_API> -
Example:
https://ivrapps-inccaas.ozonetel.com/Generic_LSQ_Callback/api.php?action=callback&customerCallBackURL=https://asyncapi-in21.leadsquared.com/2/api/telephony/logcallcomplete/xxxxxxxxxxxxxxxxxx/xxxxxxxxxx-xxxxx-xxxx-xxxx-xxxxxxxxxxxxxxxxxxxxxxxxxxxxEnsure no spaces in the URL.
Use Case 2: For Accounts with XApikey/ Async SPi
-
LSQ API format:
https://asyncapi-in21.leadsquared.com/2/api/telephony/logcallcomplete/<ORGID>/<CALLID>?xapikey=<Your_XApiKey> -
Get your xApiKey from:
My Profile → Settings → API and Webhooks → Async API. -
Prefix with Ozonetel Wrapper as shown:
https://ivrapps-inccaas.ozonetel.com/Generic_LSQ_Callback/api.php?action=callback&customerCallBackURL=https://asyncapi-in21.leadsquared.com/2/api/telephony/logcallcomplete/xxxxxxxxxxxxxxxxxxxx/xxxxxxxxxxxxxxxxxxxxxxxxxx?xapikey=Yxxxxxxxxxxxxxxxxxx
9. Update Callback URL in CloudAgent
-
Log in to CXHUB Admin → Admin Settings → Account.
-
Scroll to Callback URL → Click Edit.
-
Paste the Call Log API from Step 8.
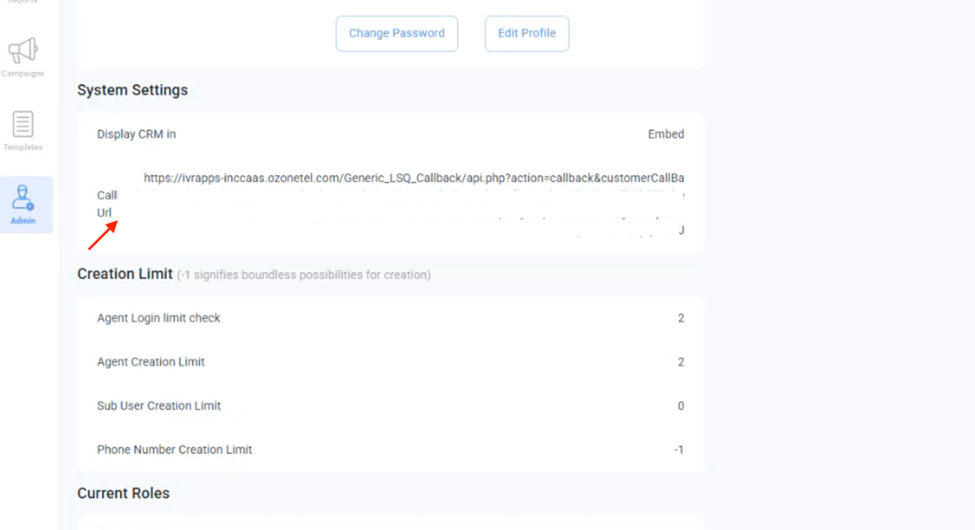
-
Ensure no extra spaces → Save.
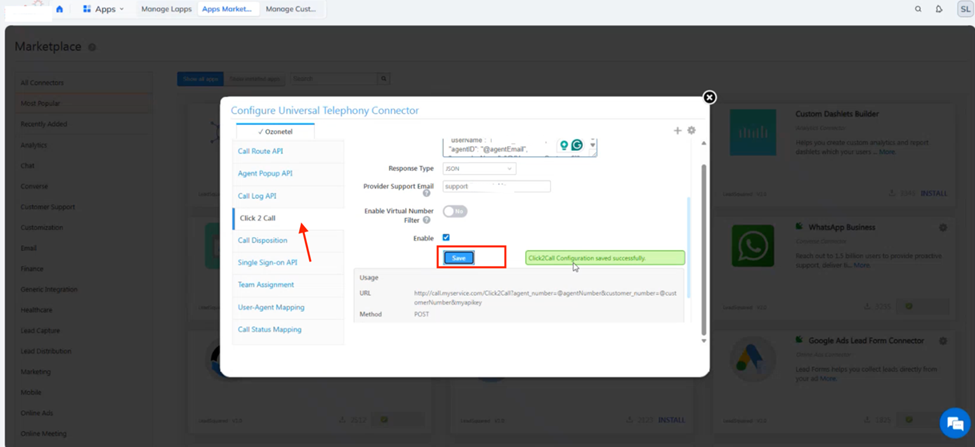
10. Configure Click2Call in LSQ
-
Go to Universal Telephony Connector → Click2Call.
-
In the URL field, add:
https://in1-ccaas-api.ozonetel.com/ca_apis/AgentManualDial -
Set HTTP Method to
POST. -
Use this Data Template:
{ "userName": "yourAdminUsername", "agentID": "@agentEmail", "campaignName": "@{User:mx_Custom_9,}", "customerNumber": "@leadPhone", "UCID": "true", "uui": "@leadId" } -
Additional settings:
-
Response Keyword: queued successfully
-
Request Type: JSON
-
Response Type: JSON
-
Support Email: [email protected]

-
-
Check Enable → Click Save.

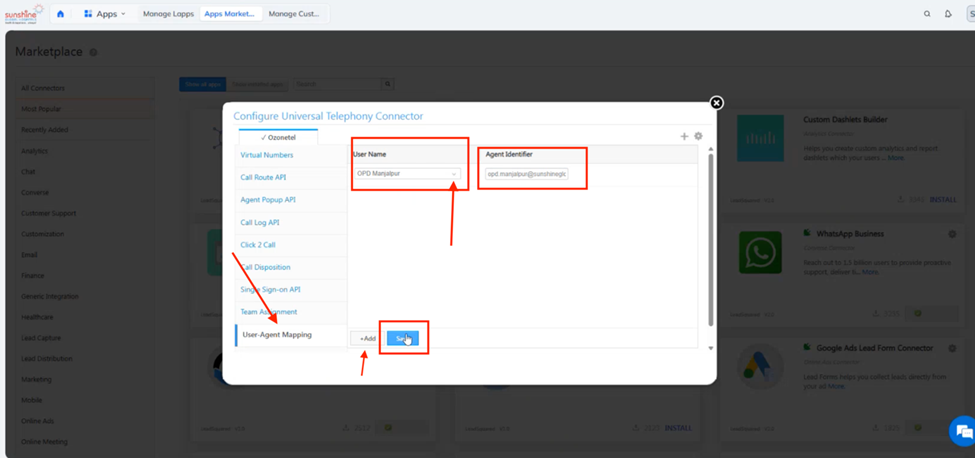
11. Map LSQ Users to CloudAgent Agents
-
Navigate to User-Agent Mapping.
-
Map each LSQ Username to the CXHUB Agent Identifier (same as LSQ email).
Note:
Agent Identifier is nothing but the Agent ID created in the CxHub Admin login. Kindly make sure to give User’s Agent ID as email ID of LSQ Panel.
-
Click Save after each mapping.
-
Use Add to map additional agents.
12. Sync Click2Call Settings
-
After mapping, reopen Click2Call → Click Save again to sync configurations for all users.
13. Configure LSQ User Profiles
-
Go to Settings → Users and Permissions → Users. The users' list would be available in this section
Search for the respective User Profile from the List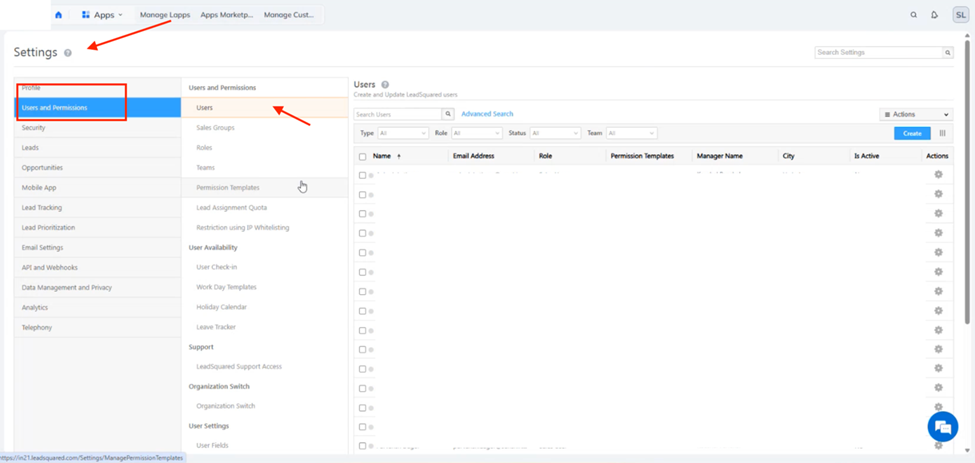
-
For each user:
-
Open profile → Click Edit.

-
Add Agent Email ID and Phone Number (top-left section).
-
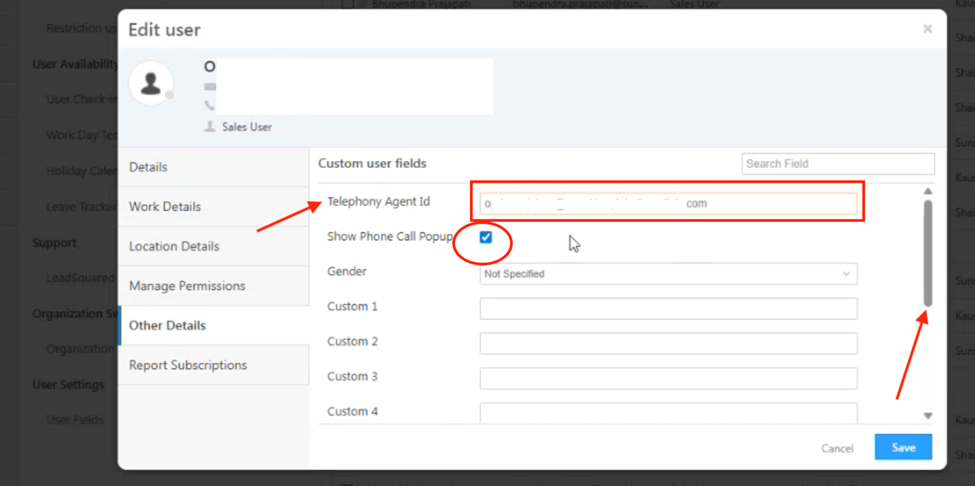
Under Other Details: click on the EDIT button in the right corner.
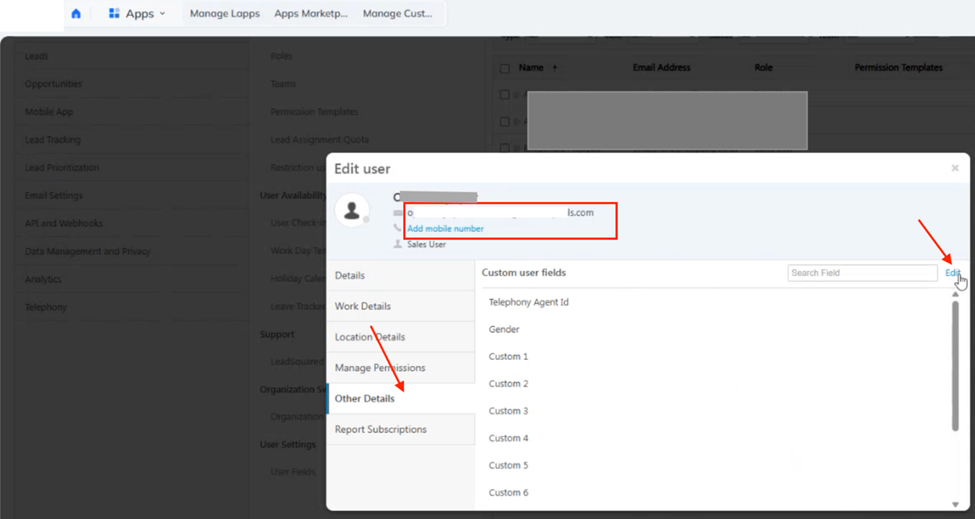
-
Add Telephony Agent ID: (CXHUB Agent ID, same as LSQ email)
-
Enable Show Phone Call Popup.
-
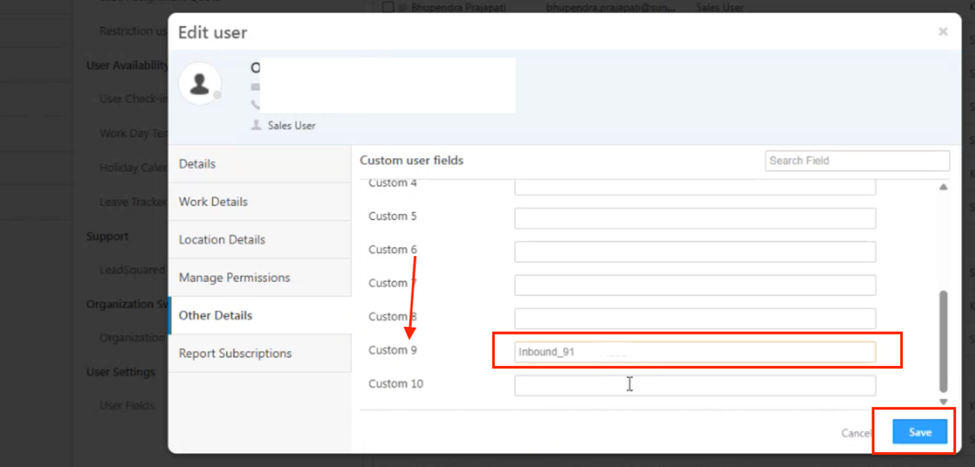
-
In Custom 9 Field, add the Campaign Name (same as CXHUB).
-
Click Save.
-
14. Add Agent Phone Numbers
-
Under Details, click Edit → Add numbers in all three fields:
- Agent Phone Numbers
- Phone (Main)
- Phone (Mobile)
Format:+91XXXXXXXXXX
-
Click Save.

-
Repeat Steps 13–14 for all users.
15. (Optional) Enable CloudAgent Panel in LSQ (Softphone)
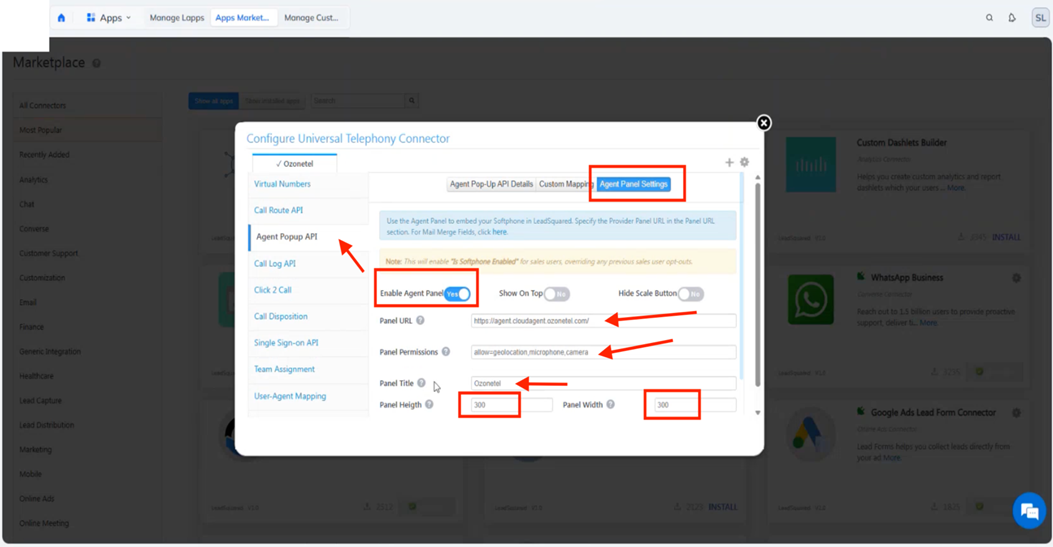
-
Go to Apps → Marketplace → Universal Telephony Connector → Agent Popup API → Agent Panel Settings.
-
Configure as follows:
-
Enable Agent Panel: Yes
-
Panel URL:
https://agent.cloudagent.ozonetel.com/ -
Permissions:
allow=geolocation,microphone,camera -
Title: Ozonetel Agent Panel
-
Height: 300
-
Width: 300
-
Click Save.
-
-
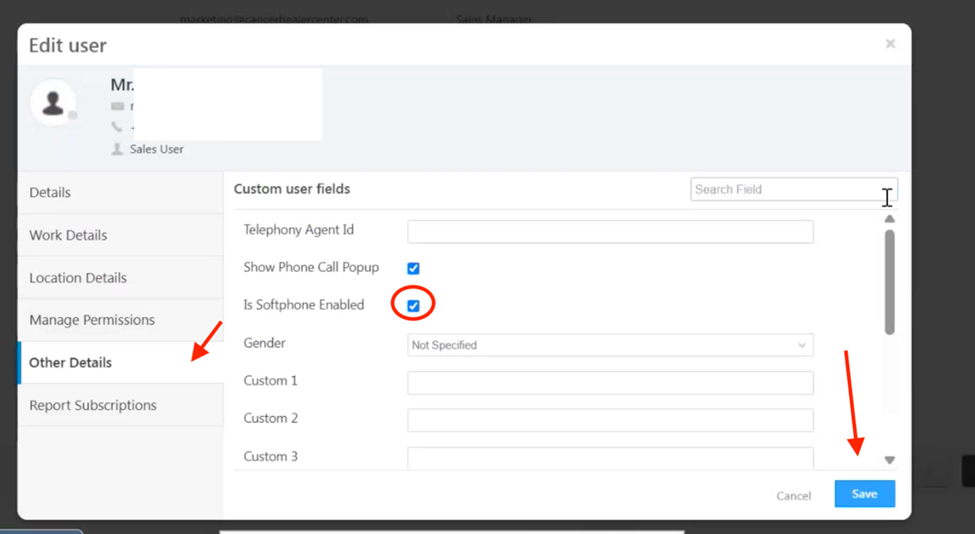
Then, in LSQ Settings → Users and Permissions → Users → Open the Respective Agent User profile → Click on Settings "Edit"
-
Once the Agent User Dialogue Box is opened, GoTo → Other Details.
-
Select the “Is Softphone Enabled” box
-
Post which, click on the “SAVE”.
-
Note – Repeat this step for all the Agent User Profiles.
-
-
Ask agents to refresh or re-login to see the panel in the bottom-left corner.
-
Agents can now log in using their CXHUB credentials.
Avoid using multiple LSQ tabs simultaneously.

Updated 9 months ago