Inbound Campaign
An Inbound Campaign handles incoming customer interactions across channels like phone, chat, and social media. It’s designed to connect customers with agents who can resolve queries efficiently and professionally.
Agents assigned to inbound campaigns are trained and configured specifically to handle these types of interactions.
Creating Inbound Campaigns
Follow the instructions below to create an Inbound campaign in your Cloud Agent account. Additionally, refer to the video tutorial for more insights on managing inbound campaigns.
On the campaigns page, click Create Campaign on the top right corner to create a new Campaign.
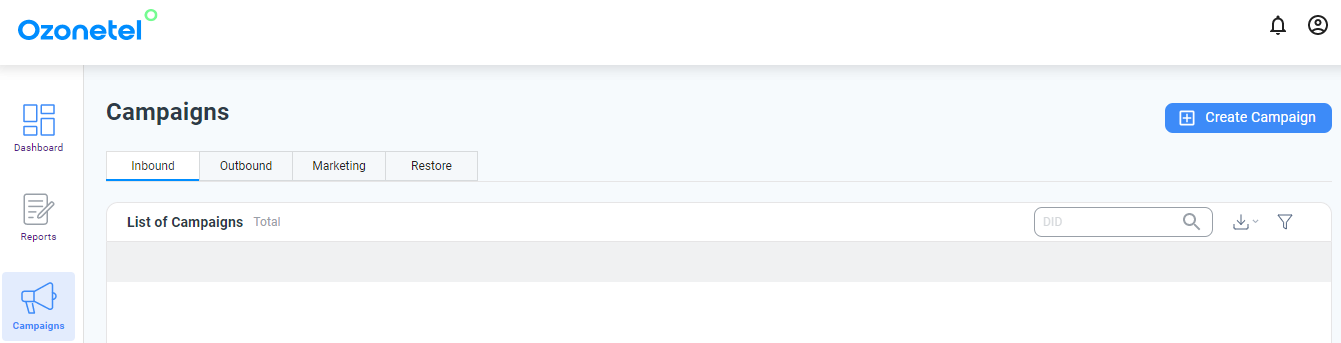
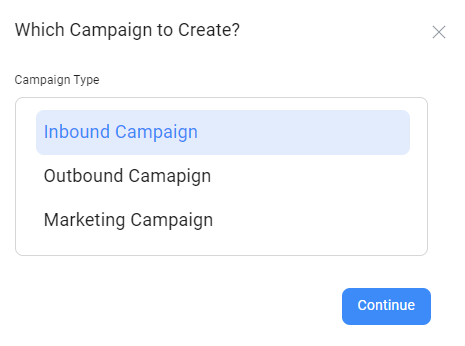
A pop-up opens to select the campaign type to be created, select the Inbound Campaign, and click Continue to proceed further.
Fill in all the campaign information needed in the fields. The campaign needs to be associated with a skill. The description of all the fields follows in the below table.
Basic Settings
| Field | Description |
|---|---|
| Campaign Name (required) | Name of the inbound campaign. |
| Campaign Type (required) | Set to Inbound |
| Sub Admin Assigned | Sub-admins who can access this campaign. |
| DID (required) | Phone number customers dial to reach this campaign. |
General Information
| Field | Description |
|---|---|
| IVR Flows | Select the IVR flow to associate with the campaign. |
| Hit ScreenPop URI at |
|
| URL to Push | Callback URL where customer details are sent. For detailed information on configuring the Callback URL, please refer to the Callback URL configuration article. |
| ScreenPopURL | CRM URL that displays customer info in an iframe on the agent’s screen. For detailed information on configuring the ScreenPopURL, refer to the Screen Pop Config article. |
| Call Prefix | Country or caller ID prefix (e.g., +91, 0). |
| Dispositions (required) | List of outcomes or reasons for tagging calls (e.g., Inquiry, Escalation). |
| Disposition Type (required) | How should the call be tagged?
|
| Wrap-up Time (In Seconds) | Time (in seconds) allowed for after-call work. 0 = unlimited. |
| Block Number | A "Blocked Number" option in a campaign refers to a feature that allows you to prevent certain phone numbers from being called. If the "Block Number" option is selected, the system will check the list of blocked numbers before making a call. If the number being called is on the blocked list, the call will not be made. This can be useful for preventing calls to numbers that have previously requested not to be called, or to numbers that have been flagged as spam or fraud. |
| Block Number Group | This group can be created and managed by the user or administrator. The "Block Number Group" is a named list of phone numbers that have been designated as blocked numbers. Once a group is created, it can be easily referenced by name when setting up a campaign. This feature allows for greater flexibility and ease of management when it comes to blocking numbers. |
| Play Disclaimer URL | Audio file played to the customer when a call is answered. The file can be in .mp3 or .wav format. (Requires manual dial to be enabled.) |
| Daily Outbound Limit per Number | Limits how many times a number can be dialed in a day (manual dial only). |
| Music Files |
|
The provided video tutorial facilitates a better grasp of the screen pop settings and their configuration within a campaign.
Campaign settings
- Offline Mode: Allows agents to continue receiving calls even when not logged into CloudAgent.
- ACW for Unanswered Call: Sends agents to the After Call Work state even if the call is unanswered.
- Allow Manual Dialing: Grants agents permission to make manual calls.
- Apply DID masking: Customer sees a mapped DID; agent always sees the primary DID.
- Agent to Agent calling: Allows internal calls between agents. To activate this function, ensure that the "Allow Internal Calling for Agents" setting is enabled in your account. For more information on the setting, refer to the admin settings page.
- Apply DNC Regulation: Ensures calls are made respecting the customer's time zone and DNC laws.
Skills:
Assign one or more skills to the campaign so agents can handle calls based on expertise. In the Skills section, add the list of Skills available to the agent for this Campaign.
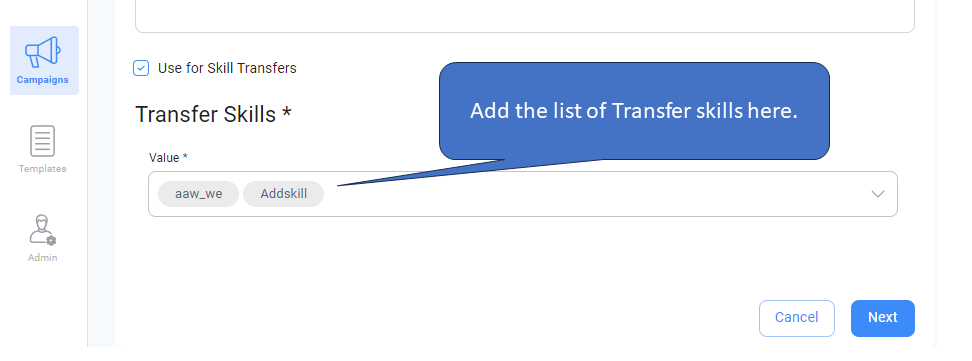
Use for Skill Transfers
Agents can perform a skill transfer internally. Admins can set up certain skills that are dedicated solely to skill transfers. This means that when an agent needs to transfer a call to another agent with a particular expertise, they can do so efficiently using these pre-configured skills.
-
The Use for Skill transfer option in the Skills section allows you to configure specific skills exclusively for use during skill transfers from the agent toolbar. When agents initiate a skill transfer, they will only see the skills that have been pre-configured in the "Transfer Skill" field.
-
This feature is available for all types of campaigns (except Chat campaigns).
-
On the agent toolbar, the process remains unchanged. The “skill transfer” dropdown will still appear as skill, but will be limited to the configured skills.
Script:
Use this section to describe the campaign’s purpose, audience, and handling guidelines. This helps align teams on intent and execution.
Finalizing the Campaign
- Once all fields are filled out, click Save.
- Click the Start/Stop button to launch or pause the campaign.
- When running, the status changes from READY to RUNNING.
